Archive for December, 2010


This is a tutorial for how to create a torrent with uTorrent and upload it to What.CD

1. Open Utorrent

2. Press “Ctrl N” or click the magic wand icon or select “File>Create New Torrent…”

https://i0.wp.com/i300.photobucket.com/albums/nn39/sharinthegroove/magicwand.jpg

3. Within the box that pops up, add the file or directory you’d like to upload using the respective button(directory just means a folder as opposed to a single file, so that will be the route for the majority of music torrents)

https://i0.wp.com/i300.photobucket.com/albums/nn39/sharinthegroove/uploadguideselectdirectory.jpg

4. In the “Trackers” box enter (copy/paste) your personal What.cd tracker announce url. (your personal passkey can be found here: upload.php ) pictured here:

https://i0.wp.com/i300.photobucket.com/albums/nn39/sharinthegroove/passkey.jpg

5. Set the “Piece Size” to auto-detect (this is the default)

6. Tick both the “Start Seeding” and “Private Torrent” and “Preserve file order” boxes

should look like this [if you were trying to upload Green Nuns of the Revolution – Rock Bitch Mafia  ]:

https://i0.wp.com/img43.imageshack.us/img43/9486/capturenc.png

7. Click “Create and Save As” to create the torrent, and save it to wherever you’d like upon its completion(It’s easiest to dedicate a Folder just for torrents – they’re incredibly small 20 kb files – for organizational purposes)

8. Go to http://What.cd/upload.php

9. Use the “Browse” button to locate the torrent file you just created (hence the need for a dedicated torrent folder)

https://i0.wp.com/i300.photobucket.com/albums/nn39/sharinthegroove/browsebutton.jpg

10. Fill out the form with all the artist info/author/app info/etc and tick all applicable boxes

  • Tracklists can be found using the WaffleBrainz script (available here) which automatically fills in everything on the upload page. You’ll need the Greasemonkey script manager to run this (available here) Otherwise, you can find tracklistings at either http://freedb.org or http://gracenote.com . Of course, you’re also allowed to manually type tracklists and info in, and there’s no limit to creativity one can put into torrent descriptions
  • It’s also helpful and more appealing to include a pic of the album on the album page. Use a search engine (i.e. Google) to search images of the album you’re upping, find the url of the image you’d like to use, and insert it into your description in this format, without spaces: [ img=whatevertheurl ]

https://i0.wp.com/i300.photobucket.com/albums/nn39/sharinthegroove/imageupload.jpg

It’s best to save the image and upload it to a free hosting service such as imageshack.us beceause image URLs tend to change.

  • PLEASE download and use the freely available and extremely useful Audio Identifier to determine bitrates and encoder settings (will tell you if it’s V2, V0, 320, FLAC, etc) when uploading music torrents.

11. Double-check for mistakes in the form, then click “Do It”

  • If uploading a music torrent, be sure to tick the “not a transcode” box

12.Go back to Utorrent, stop and then start the torrent to update it

https://i0.wp.com/i300.photobucket.com/albums/nn39/sharinthegroove/stopstartutorrent.jpg

13. Profit \o/


iphone破解后动作

1. cydia 添加http://www.sinfuliphonerepo.com , app.weiphone.com/cydia , iFile Cracked~.cydelete,IPA补丁. backgrounder.VUnlock.safari download manager.

repo 源 ultrasn0w解锁. install0us

http://fit4.cn/iphone/help#p2 (Cydia源: http://cydia.fit4.cn/)

2.装openssh ,switcherMod

3.铃声目录 /private/var/stash/Ringtones.jMrpnn/      or      library/ringtones

cyberduck ssh到iphone改密码。
1, 用cyberduck连接iphone,点工具栏的terminal图标; 或者直接用terminal 输入: ssh root@[iphone的局域网ip], 回车, 然后输入密码, 回车

2, 输入passwd, 回车

3, 输入新密码: 回车; 再输入一次, 回车,mobile~

4.remove backgrounder.

sync google acount with iphone

Skip to content

Google Sync: Set Up Your Apple Device for Google Sync

To set up Google Sync on your iPhone, iPad or iPod Touch device, please follow the steps below.


Requirements and Upload

1. Google Sync is only supported on iPhone OS versions 3.0 and above. You can check your current version by going to SettingsGeneralAboutVersion. To upgrade, follow the instructions athttp://www.apple.com/iphone/softwareupdate/. Please upgrade to iPhone OS 3.0 before setting up Google Sync.

2. Perform a sync with iTunes to ensure that Contacts and Calendars from your iPhone are backed up to your computer. Learn more about backing up your Contacts and Calendars.

3. If your business, school, or organization uses Google Apps, your administrator will first need to enable Google Sync before you can take advantage of this feature. Note that if you enable Google Sync, your administrator may also exercise additional remote management capabilities (such as remote wipe or password requirements). Click to learn more or contact your administrator.

Getting Started

1. Open the Settings application on your device’s home screen.
2. Open Mail, Contacts, Calendars.
3. Tap Add Account….
4. Select Microsoft Exchange. OS 4.0+ now allows multiple Exchange accounts. However, if you’re on a device that doesn’t let you add a second account, you could also use CalDAV to sync Google Calendar and IMAP to sync Gmail.

settings mail calendar contacts on iphone add mail calendar contacts account on iphone microsoft exchange

Enter Account Info

5. In the Email field, enter your full Google Account email address. If you use an @googlemail.com address, you may see an “Unable to verify certificate” warning when you proceed to the next step.
6. Leave the Domain field blank.
7. Enter your full Google Account email address as the Username.
8. Enter your Google Account password as the Password.
9. Tap Next at the top of your screen.
9a. Choose Cancel if the Unable to Verify Certificate dialog appears.
10. When the new Server field appears, enter m.google.com.
11. Press Next at the top of your screen again.

exchange domain exchange server

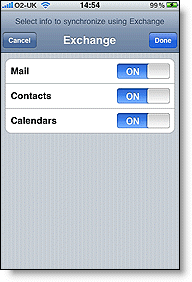
12. Select the Google services (Mail, Calendar, and Contacts) you want to sync.

13. Unless you want to delete all the existing Contacts and Calendars on your phone, select the Keep on my iPhone option when prompted. This will also allow you to keep syncing with your computer via iTunes.

If you want to sync only the My Contacts group, you must choose to Delete Existing Contacts during the Google Sync install when prompted. If you choose to keep existing contacts, it will sync the contents of the “All Contacts” group instead. If there are no contacts on your phone, the latter will happen — the contents of your All Contactsgroup will be synced.

iphone exchange mail calendars contacts exchange keep on my iphone

You’ve set up Google Sync! Synchronization will begin automatically if you have Push enabled on your device. You can also open the Mail, Calendar or Contacts app and wait a few seconds to start a sync.

Next choose which calendars to sync, if you’d like to enable multiple calendars. 


MacroVPN官网:http://www.macrovpn.com/下面我详细讲解一下使用VPN帐号翻墙的方法(有经验的网友申请一个帐号就会了)

1.登录MacroVPN的官网 — 在网页右上角点击Get A Free Trial(注册帐号页面) — 填写自己的资料,牢记帐号密码,在最后一项Initial prepaid service选择A Free VPN(一个免费的VPN帐号) — 注册成功

2.返回官网注意一下左边栏有一个Customer Control Panel(用户控制面板)点击进入 — 输入刚才的注册的帐号密码 ,页面跳转你的帐号面板,你会发现面板支持中文,好了,在你的管理中心记下VPN(PPTP L2TP) 服务器下的三个服务器地址中的其中一下,例如us6.macrovpn.com

3.返回操作系统,这里我主要介绍WIN7系统用户操作方法:控制面板 — 网络和Internet – 网络和共享中心 — 设置新的连接或网络 — 连接到工作区 — 使用我的Internet连接VPN — 在Internet地址输入刚才记下的MacroVPN服务器地址,例如us6.macrovpn.com — 输入你的MacroVPN的帐号密码 — 确认完成。(XP用户可能要选择服务器类型为PPTP)

使用VPN翻墙确实是件很简单的事,但为了照顾一下可能第一次操作的网友我才这样长篇大论。

MAC

先说说苹果电脑Mac OS X系统下设置好VPN后上网就能翻墙的原理:假设A网站被封杀了,一旦有数据从A流向你,就会被某群人截住。而VPN就是在国外的服务器架设一个中转“B”,你通过VPN上网的话,就是先把数据读到“B”那里,再从“B”发给你…绕一个圈,就能干掉 GF* 了(你知道我省略了哪个字母,对吧)。更多信息请看维基百科的解释
好了,首先,确认你购买了VPN服务,记住你的帐号和密码,下面要用到。

苹果电脑Mac OS X系统下设置VPN翻墙上真正互联网的教程
点击苹果电脑屏幕左上角的Apple标志,在下拉菜单里选择“系统偏好设置…”,再点击“网络”图标
苹果电脑Mac OS X系统下设置VPN翻墙上真正互联网的教程
点击左下方的“+”号,添加一组网络设置
苹果电脑Mac OS X系统下设置VPN翻墙上真正互联网的教程
在弹出窗口里,有2个选项
苹果电脑Mac OS X系统下设置VPN翻墙上真正互联网的教程
“接口”一项,在下拉列表里选择“VPN”
苹果电脑Mac OS X系统下设置VPN翻墙上真正互联网的教程
你会发现,第一项选择“VPN”以后,下面的也跟着变化了。“VPN类型”一项,要看你买的VPN了,一般就是PPTP、L2TP等等,这个不用管,买VPN的时候代理商会告诉你。在下面的名称一栏就随便你了。
苹果电脑Mac OS X系统下设置VPN翻墙上真正互联网的教程
“服务器地址” 和 “帐户名称”是你VPN注册邮件里的,找到填进去即可。注意:服务器地址既可以填域名也可以填ip,我的经验是:ip更靠谱。别忘了下面的“加密”选项,除非你的VPN代理商有特殊要求,一般选择“自动(128位或40位)”。最后,点击“鉴定设置”,弹出下图所示窗口
苹果电脑Mac OS X系统下设置VPN翻墙上真正互联网的教程
VPN鉴定设置窗口,实际上就是输入VPN密码啦。
苹果电脑Mac OS X系统下设置VPN翻墙上真正互联网的教程
输完VPN密码回到上面的界面,点击“高级”,会出现下图所示界面
苹果电脑Mac OS X系统下设置VPN翻墙上真正互联网的教程
勾选图中这几项
苹果电脑Mac OS X系统下设置VPN翻墙上真正互联网的教程
点击“连接”,会出现下图所示连接状态。
苹果电脑Mac OS X系统下设置VPN翻墙上真正互联网的教程
恩,您的苹果电脑已经连接上VPN了,享受真正的互联网吧。建议勾选“在菜单栏中显示VPN状态”,这样就能在Mac OS X界面顶部的菜单栏显示连接情况并随时可以连接或断开VPN。

后记:这个翻墙方法可以适用于iPhone、iPad一些电子产品,设置原理跟电脑无异,但是记得选取服务器的使用要选择PPTP。VPN帐号每月提供2G的流量、256kbps,对于我这些平时上twitter的人来说,足够的很。如果是需求大的用户可以选择购买收费服务器。

为了上被GFW和谐(墙掉)的网站,我们必须翻·墙,下面是在苹果iPhone手机、iPod touch上设置VPN翻墙的方法。
记下你的VPN帐号密码,打开苹果iPhone手机、iPod touch的WIFI,开始设置VPN代理翻墙。

在苹果iPhone手机、iPod touch上设置VPN代理翻墙的方法
在苹果iPhone/iPod touch主界面点击“设置”(那个齿轮图标,我就不截图了),选择“通用”

在苹果iPhone手机、iPod touch上设置VPN代理翻墙的方法
下一步当然选择“网络”啦

进入苹果iPhone手机、iPod touch的VPN设置界面
OK,看到VPN一栏了,未配置……那就点击它进入配置VPN界面

为苹果iPhone手机、iPod touch添加VPN配置
点击“添加VPN配置…”
设置苹果iPhone手机、iPod touch的VPN帐户,PPTP、L2TP、IPSec值

别管那个“PPTP”、“L2TP”、“IPSec”什么意思,你买的什么VPN就选那一项(VPN销售商会告诉你的),把下面的VPN信息写对就行。“描述”一栏随便写,我写“苹果fans原创”是为了保护版权。“服务器、帐户、密码”那一栏,你买VPN的确认邮件里肯定有。

接通苹果iPhone手机、iPod touch的VPN,翻墙上网了
划开第一个滑块,接通苹果iPhone手机、iPod touch的VPN,翻墙上网了^_^。这时,苹果iPhone手机、iPod touch的屏幕顶部无线信号(左上方贝壳型标志)图标旁会出现“VPN”图标
在苹果iPhone手机、iPod touch上设置VPN代理翻墙,从Safari直接登陆Twitter页面

成功

方法一:“无界浏览”或者“自由门”

方法二:gladder (for firefox)

方法三:VPN

  1. AnchorFreeHotspot Shield
  2. AlonWeb
  3. UltraVPN

方法四:

  1. OperaTor (Opera + Tor)
  2. XeroBank

方法五 GAppProxy

方法六 在线代理

  1. https://gaopiproxy.appspot.com/
  2. https://soproxy.appspot.com/
  3. http://www.sneakme.net/


方法七 SSH

https://groups.google.com/group/gaopi/web/get-over-the-wall

deactivate

iPhone developer and hacker Sam Bingner has released Subscriber Artificial Module (SAM) method which will allow you to officially activate your iPhone 4, 3GS and 3G without hacktivating, or using original SIM card.

Quote:
“Subscriber Artificial Module (SAM)” tricks your iPhone and iTunes into creating legitimate activation tickets even though you’re unlocked with ultrasn0w. This means you get the full benefit of push applications, and your battery life increases substantially. If you’d like to try it out, check out Subscriber Artificial Module
The benefit of Subscriber Artificial Module (SAM) as opposed to hacktivation is that it will result in great battery life, fully working push notifications and so on just like how it is on the officially activated iPhones.

Follow the instructions posted below to officially activate your iPhone using this new method.

Step 1: Download the latest Redsn0w 0.9.6b6 for Windows or Mac via the links given at the end of this post.

Step 2: Follow the instructions posted here to jailbreak your iPhone using this latest version of Redsn0w 0.9.6b6.

Step 3: Once you have jailbroken your iPhone, start Cydia and add ‘http://repo.bingner.com repository’

Step 4: Now install “SAM” and “SAMPrefs”

Step 5: Now start the latest Redsn0w 0.9.6b6 again and select “Deactivate” option as shown in the screenshot below. This will allow your iPhone to revert back to a stock lockdownd in order for SAM to function.

Step 6: Now navigate to Settings > SAM and click “De-Activate iPhone”

Step 7: Start iTunes. Make sure your iPhone is connected. Allow iTunes to activate your iPhone officially.

Note: If iTunes says invalid SIM, you will need to manually select the appropriate carrier under one of the methods besides “Automatic” and click on a SIMID.

Once done, you should see the following message on your iPhone:

Step 8: Now simply follow the steps posted here to unlock your phone using Ultrasn0w 1.2 so that you can use it on any carrier you like.